There has been enough talk on vSphere Home Lab based on VMware Workstation. I have tried doing that. It's great, but with slow performance and still acceptable when you access the lab directly sitting at the machine itself. But what about a lab which I want to access from anywhere in the world and without any slow performance? This solution is not at all a suitable one.


Hereby I will give you a complete idea (step by step) to create a High Performance (Yes it is possible!) Home Lab accessible remotely. And I assure you there will be no mouse lagging or latency issue.
No further talks, straight to building the lab now...
So what you need to build this lab...
Pre-requisites:
Pre-requisites:
1. A decent hardware. My suggestion: Go for a desktop PC with Intel i7 3Ghz, at least 16GB RAM, one 2TB SATA HDD dedicated for this purpose. These is cheap commodity now-a-days. If you can get a SSD of at least 250GB that's great, you will get terrific performance! But if you can't, still okay. I assume you have a decent broadband line with wifi, everyone has now-a-days. Connect your Desktop PC to the Wifi Router through a Ethernet cable. Let's assume the Wifi Router IP is: 192.168.0.1
If you have an existing PC matching similar configuration that's great. You will now ask: "But do I have to wipe out my existing Windows/Linux and any other applications?" No, you don't need to. That's why I asked for a spare HDD (call it as HDD2) of 2TB. I assume your Windows OS and other applications are sitting on HDD1. We will keep them intact, we are not going to touch them.
So, what next?
Ans: Make use of ESXi USB Installation. Take a 4GB USB stick. Keep it exclusively to store your ESXi installation.
Step1. ESXi installation on bare metal machine with the help of USB:
Boot your PC through ESXi DVD Installer CD. Alternatively if you have another (2nd USB stick of at least 4GB) USB stick and the .ISO file of ESXi downloaded from VMware site, you can make the 2nd USB stick bootable drive with the help of a free tool called "UNetbootin".
Download it from http://unetbootin.sourceforge.net/ by clicking on downloading for Windows (I will cover Windows here, you can choose Linux as well depending on your current OS)
Click on the "Diskimage" radio button and select "ISO". Click on "..." button and select the ESXi installer ISO from the location wherever you kept it.
Make sure the type is: "USB" and on the Drive choose the Drive letter of USB Stick 2. Click on "OK". This will make the 2nd USB stick as bootable ISO. Or else you will need to download the ISO and burn it to a DVD and boot from that DVD.
Go through the ESXi installation process and install ESXi on the 1st USB stick. This way you are using your PC's hardware more like in a bare metal server but you are not touching the existing Windows OS with applications. You can always go back to your Windows by NOT booting from the 1st USB stick. So, now you have installed your 1st ESXi on your home lab.
Go ahead and configure the ESXi with a management port with:
IP address: 192.168.0.100 | Subnet: 255.255.255.0 (should be at per with what your Wifi router provides to it DHCP clients) | Default Gateway: 192.168.0.1 (IP of the Wifi Router)
Step2. Configure the 1st ESXi by connecting to it so that it can host a nested ESXi by editing the required files. There are other blogs if you want to know what are the changes required to do in the 1st ESXi (or Base ESXi) so that it can host nested ESXi.
Step3: Open vSphere Web Client on another machine/laptop and connect to the newly installed ESXi (IP: 192.168.0.100). Create a Datastore of 2TB from the spare HDD you kept aside for this home lab. I assume the drive is connected in the drive bay in the PC and ESXi Host can access this disk. Give this Datastore a name, say: TOSHIBA
Step3: Create a VM and install ESXi on that. Give it 4GB vRAM and 2x2=4vCPUs. This will be your 2nd ESXi and it is nested on top of 1st or the Base ESXi. Give it a Management IP of 192.168.0.101 | Subnet: 255.255.255.0 | Default Gateway: 192.168.0.1 (IP of the Wifi Router)
Step4: Create another VM of 4GB vRAM, 2x2=4vCPUs (for better performance. You can reduce the configuration gauging the performance), 20GB Thin Provisioned Disk. Install Windows Server 2008 R2 64Bit. Install the required Service Pack and Windows Patches.
Step5: Give it IP of 192.168.0.110 | Subnet: 255.255.255.0 | Default Gateway: 192.168.0.1 (IP of the Wifi Router)
Step6: Install vCenter Server on this with SSO. And also install the vSphere Web Client Server. I assume you keep the default port setting for http and https which are 9090 and 9443 respectively.
Step7: Check if you can access the vCenter through Web Client from your laptop by going to this web url: https://192.168.0.110:9443/vsphere-client/ If yes, you are almost there! Login with the required credentials. Create your sample Data Center and you both the ESXi Hosts on this virtual Data Center.
Now you have a Nested ESXi Home Lab which is fast, simple and agile too. But how do I access it from Internet? (Your next question)
For this you need a Public IP. Public IP is expensive to get one from the ISP. So, how we do go about it?
We will use a great free stuff for this purpose called "No-IP DUC (Dynamic Update Client)"
Step8: Go to http://www.noip.com/downloads.php?page=win from your vCenter Server. Click on "Download" button and install it on the vCenter Server. It will install the "Dynamic Update Client" from No-IP on your vCenter Server. Now you need to go the no-ip.com site and register for a free dynamic DNS by providing your email and choosing a password and activate it. It will provide you a FREE PUBLIC IP.
Step9: Go to vCenter and login to DUC client by the email address and password you used in Step8.
To make you understand, the DUC client sitting on your vCenter Server will do kinda NAT operation from Public IP to Private IP whenever you try to access the vCenter from outside.
But hold on! You still will not be able to access your machine from outside unless you specify the exemption rule with the vCenter Internal IP and Port number on your Wifi Router. Because any traffic coming down to vCenter from web has to go through the Wifi Router first. So, for example you are trying to access vCenter by RDP from Web, your Wifi should not block Port 3389 (RDP Port) traffic coming to the vCenter Server (to Internal IP which is 192.168.0.110).
So how do we do it?
Step10: Login to your Wifi Router and go to the Advanced Option. It depends on which router you are using. I am using a DLINK router and it shows me a screen like this:

Put the settings exactly the way I have put it in the screen. In case the input part is not clearly visible in the picture, let me post a zoomed picture for better visiblity.
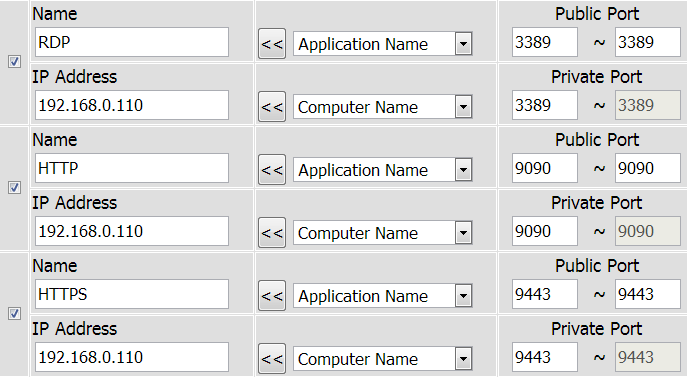
Once the setting is done, click on "Save Settings". It will ask you to reboot the router.
Step11: Restart the Wifi Router.
Step12: Go to any other PC/laptop's (NOT any mobile device!) browser and give this url:
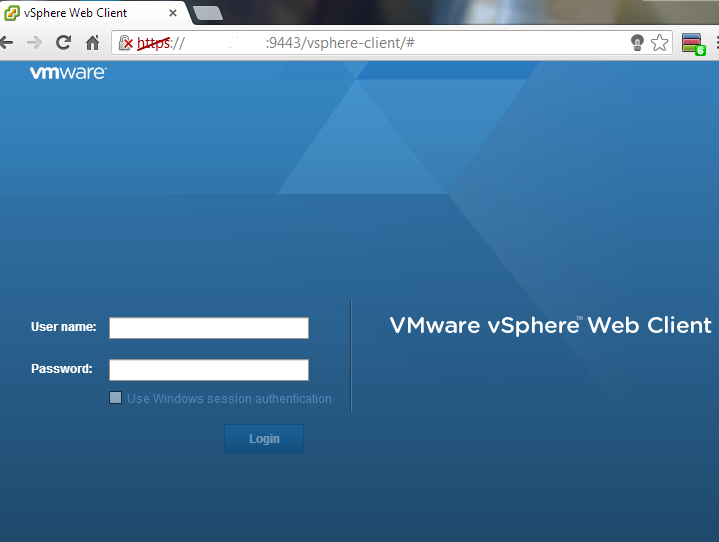
https://<Your Public IP You Received from No-IP>:9443/vsphere-client/ and hit Enter. You should see the vSphere Web Client Login Screen like this:
Step13: Login with your vCenter Administrator ID and Password and you will see a screen like this:

Keep playing with your vSphere Home Lab remotely from anywhere as long as you have an internet connection as Adobe Flash enabled Browser. Remember you will NOT be able to connect to this Home Lab from iPAD or Android Tablets since they don't support Adobe Flash.
For that you need a separate server (or appliance) to be installed, called as "VCMA Server". But with the DUC Client in picture it may be slightly difficult to install the DUC client in the VCMA since it is an appliance until now. I have not tried the DUC Linux Client yet and also not sure whether it will be able to get installed in any VMware appliance. It should be, since the appliance is nothing but SUSE or some other Linux variant on the OS level. That makes a room for another blog post...
Happy playing around with your Home Lab REMOTELY :-)
No comments:
Post a Comment